- Recipe and Ingredients:
- 🗂️ Filtering by Category in Master Ingredients
- 📦 Supplies
- 🧂 Ingredients
- ✏️ Editing an Ingredient & Adding New Purchase Quantity
- 🧂 Accessing Ingredient Edit Mode
- 🧾 Update Ingredient Details
- 📜 Purchase History Section
- ➕ Adding a New Ingredient Purchase
- 🔄 Editing or Deleting Purchase Records
- 🏷 Supplier Assignment (Optional)
- 💾 Saving Changes
- 🔗 How This Impacts Bake Boost Features
- 💡 Best Practices
- ✅ Summary
- 🎂 Recipes
- 🧾 Adding Recipe Item to an Order
Recipe and Ingredients: #
Recipes and Ingredients are very efficient features in the Bake Boost app. It helps you to manage your Recipes the way you want them and the way the Industry should be using them
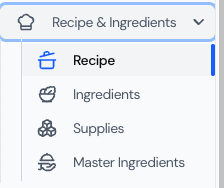
- Recipes: it allows you to add your own new Recipes
- Ingredients: to manage the Ingredients for Recipes
- Supplies: You need to use the supplies in the recipes
- Master Ingredients: Bake Boost is providing you with a list of Master Ingredients, which you can use as a baseline for creating your own Ingredients
🧁 Master Ingredients
The Master Ingredients section in Bake Boost provides a ready-made library of commonly used ingredients. This helps you quickly start building recipes without having to manually enter every ingredient from scratch.
Bake Boost’s Master Ingredients are curated based on industry standards — giving you a solid foundation that you can expand or customize according to your bakery’s needs.
🔍 Viewing Master Ingredients
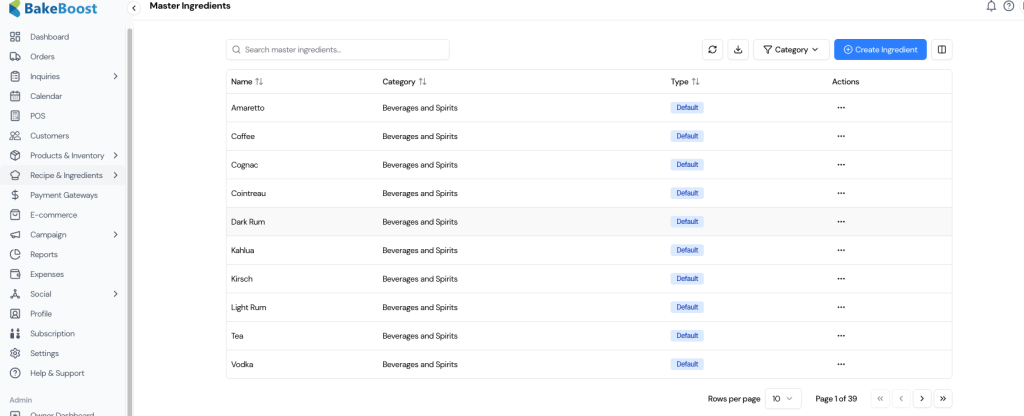
When you open the Master Ingredients page, you’ll see a searchable list of all ingredients available in the system.
Each ingredient is displayed with:
- Name: Ingredient name (e.g., Amaretto, Coffee, Vodka)
- Category: The category it belongs to (e.g., Beverages and Spirits)
- Type: Indicates whether it’s a default system ingredient or one you’ve added manually
- Actions: Options to edit or manage individual items
You can use the search bar at the top to quickly find any ingredient or filter the list by category.
(Refer to the screenshot below for an example of the Master Ingredients list view.)
🗂️ Filtering by Category in Master Ingredients #
Bake Boost allows you to quickly find the ingredients you need by filtering the Master Ingredients list using Categories.
This makes it simple to locate a specific type of ingredient — especially when your ingredient library grows large.
🔽 How to Use the Category Filter #
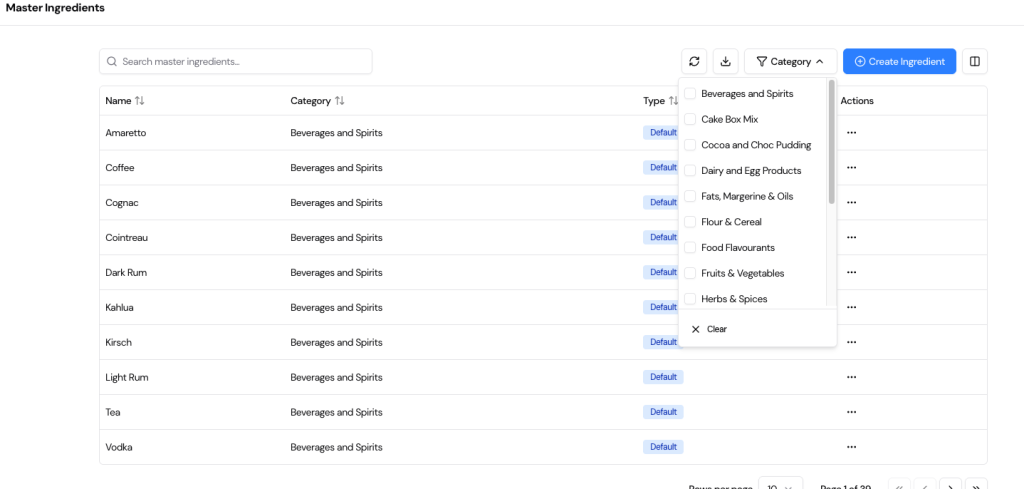
At the top-right corner of the Master Ingredients page, you’ll see a Category filter button next to the Create Ingredient option.
- Click on the Category dropdown.
- A list of available ingredient categories will appear (as shown in the screenshot).
- Select one or multiple categories to view only the ingredients belonging to those groups.
- You can click Clear at the bottom of the dropdown to remove all filters and return to the full list.
📋 Available Categories #
Bake Boost includes a wide range of pre-defined ingredient categories to keep your recipes organized, such as:
- Beverages and Spirits
- Cake Box Mix
- Cocoa and Choc Pudding
- Dairy and Egg Products
- Fats, Margarine & Oils
- Flour & Cereal
- Food Flavourants
- Fruits & Vegetables
- Herbs & Spices
- etc
These categories help you maintain consistent ingredient classification across all your recipes, ensuring easier management and reporting.
💡 Tip: #
Use the Category filter when you need to review or adjust ingredients of a particular type — for example, when updating all your Dairy and Egg Products or checking all Flour & Cereal items before recipe costing.
➕ Creating a New Ingredient #
If you need to add an ingredient that isn’t part of the default Master list, you can easily create one.
Click the Create Ingredient button in the top-right corner of the page.
A pop-up form will appear (as shown below).
Fill in the following fields: #
- Name: Enter the name of your ingredient. (Required)
- Category: Choose the appropriate category from the dropdown list. (Required)
- Description: (Optional) Add a short description or note about the ingredient for reference.
Once done, click Create Ingredient to save it.
The new ingredient will now appear in your list and can be used in your recipes.
(Refer to the screenshot below for the “Create New Ingredient” pop-up form.)

📦 Supplies #
The Supplies section in Bake Boost allows bakeries to manage all non-recipe materials and consumables needed in day-to-day operations — such as packaging items, boards, ribbons, cleaning materials, and edible papers.
This helps you keep track of your essential supplies, link them with suppliers, and maintain cost visibility for better expense management.
📋 Viewing Supplies #
On the Supplies page, you’ll see a complete list of all your supply items along with key details for easy reference.
Each row in the table displays:
- Supplies: The name of the item (e.g., Board, Milk, Pan).
- Supplier: The vendor or supplier associated with the item (if applicable).
- Category: The classification of the supply (e.g., Packaging, Boxes, Cleaning Supplies).
- Item Price: The per-unit price for cost tracking and recipe costing.
- Actions: Options to edit, update, or remove the supply item.
You can search for specific supplies using the search bar at the top or filter by category to view only selected groups of supplies.
(Refer to the screenshot below to see the Supplies list view.)

➕ Adding a New Supply #
To add a new item to your supply inventory:
- Click the Add Supplies button at the top right of the page.
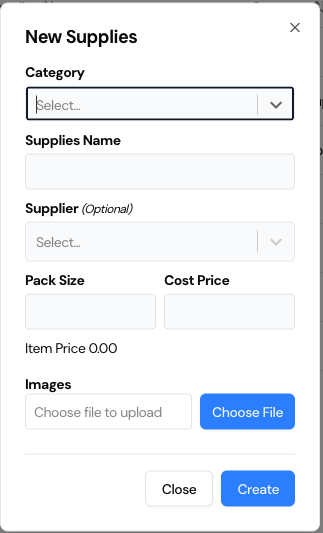
- A pop-up form titled New Supplies will appear (as shown in the screenshot).
Fill in the following fields: #
- Category: Select the appropriate category (e.g., Packaging, Edible Supplies, Cleaning Supplies).
- Supplies Name: Enter the name of the item (e.g., Cake Board, Edible Paper A4).
- Supplier (Optional): Choose a supplier from your existing supplier list, if applicable.
- Pack Size: Specify the quantity or unit in which the item is purchased (e.g., 10 sheets, 1 liter).
- Cost Price: Enter the total cost of the pack.
- Item Price: Automatically calculated per unit based on the cost and pack size.
- Images: Optionally upload an image of the item for better identification in your inventory.
After filling in the details, click Create to save your new supply.
The item will be added to your Supplies list and will now be available for use in your recipes or cost calculations.
🧾 Tip: #
Keep your Supplies list updated regularly with accurate prices and supplier information — this ensures precise recipe costing and efficient procurement tracking.
🧂 Ingredients #
The Ingredients section in Bake Boost helps manage all the raw materials used to prepare your recipes.
It connects directly with your Master Ingredients library and Supplies, allowing you to create accurate recipe formulations and maintain precise costing for every ingredient used in your bakery operations.
This section is designed to give you complete control over your ingredient data — from purchase sizes and supplier details to cost tracking — ensuring consistency and efficiency in recipe management.
📋 Viewing Ingredients #
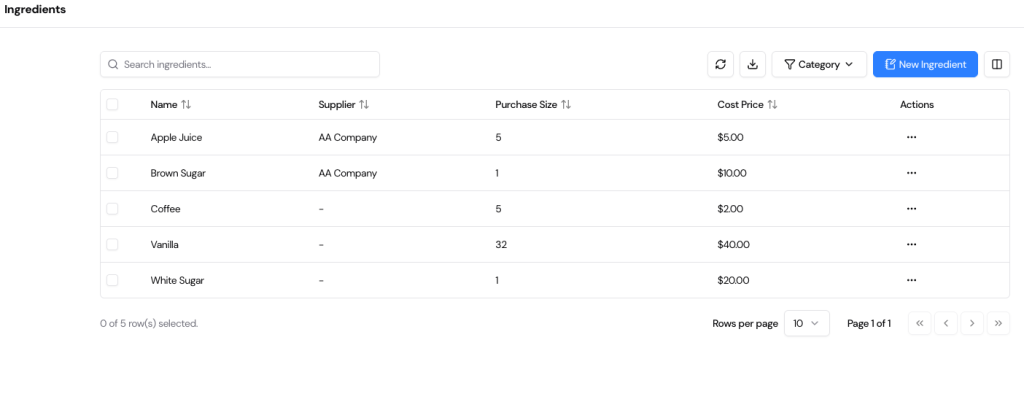
The Ingredients page displays all the ingredients currently available in your system.
Each entry includes key details such as:
- Name: Ingredient name (e.g., Apple Juice, Brown Sugar, Vanilla)
- Supplier: Linked supplier (if available)
- Purchase Size: The quantity or volume purchased from the supplier
- Cost Price: The total purchase cost for that size
You can use the search bar to quickly find any ingredient or filter the list by category using the dropdown at the top.
(Refer to the screenshot below for an overview of the Ingredients list.)
➕ Adding a New Ingredient #
To add a new ingredient:
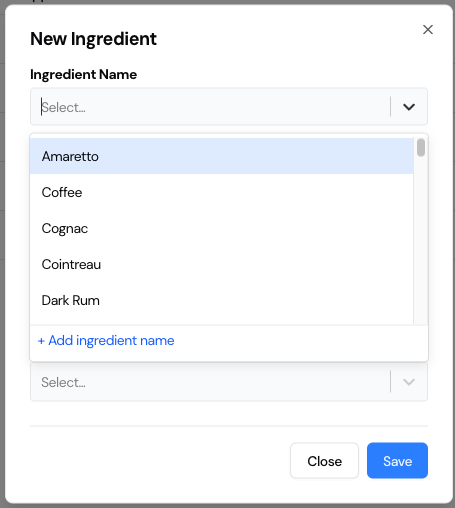
- Click New Ingredient at the top-right of the screen.
- The New Ingredient window will appear (as shown below).
Ingredient Name Options #
When selecting an ingredient name, Bake Boost offers two flexible options for bakers:
- Option 1: Select from the predefined list of Master Ingredients.
These are standard ingredients provided by Bake Boost — such as Amaretto, Coffee, Cognac, or Dark Rum — following industry naming standards.
- Option 2: Create your own ingredient name.
If your ingredient is not listed, click “+ Add ingredient name” to add a custom entry.
This allows you to tailor the system to your bakery’s specific ingredients or local product variations.
(See the screenshot below showing both options in the Ingredient Name field.)
🧾 Complete the Ingredient Details #
After selecting or adding the ingredient name, fill in the remaining fields:
- Type: Choose the type (e.g., Default, Custom).
- Purchase Size: Enter the quantity purchased (e.g., 5 kg, 2 liters).
- Measurement: Select the unit of measurement (kg, g, L, ml, pcs).
- Cost Price: Enter the cost for the full purchase quantity. The app automatically calculates the cost per unit.
- Supplier (Optional): Select from your existing supplier list for accurate cost tracking and reporting.
Click Save once all fields are filled.
Your new ingredient will now appear in the Ingredients list and can be used when creating or updating recipes.
💡 Tip: #
Use the Master Ingredients list to maintain standardization across recipes, and create custom ingredients only when your bakery uses unique materials or regional variations.
This balance ensures consistency and flexibility in managing recipe data.

✏️ Editing an Ingredient & Adding New Purchase Quantity #
Bake Boost allows bakers to update ingredient details and record new purchases over time instead of overwriting existing data.
This ensures accurate stock tracking, cost calculation, and historical visibility of ingredient purchases.
🧂 Accessing Ingredient Edit Mode #
To edit an ingredient:
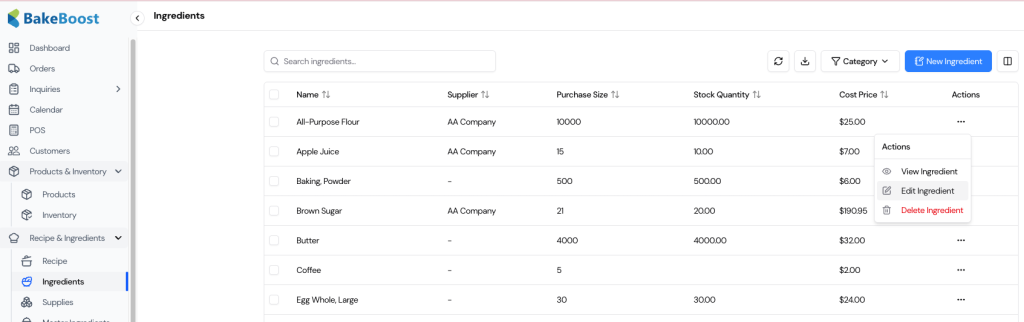
- Go to Recipe & Ingredients → Ingredients
- Locate the ingredient in the list
- Click the Actions (⋯) menu
- Select Edit Ingredient
The Update Ingredient screen will open.
🧾 Update Ingredient Details #
In the Update Ingredient screen, the following fields can be reviewed or updated:
Ingredient Information #
- Ingredient Name – Displays the selected ingredient
- Type – Ingredient classification (e.g., All Purpose Flour)
- Measurement Unit – Base unit used for stock and costing (e.g., g – gram, kg, l, ea)
⚠️ Important:
The measurement unit defines how inventory and recipe usage are calculated. Changing it affects costing and stock logic.
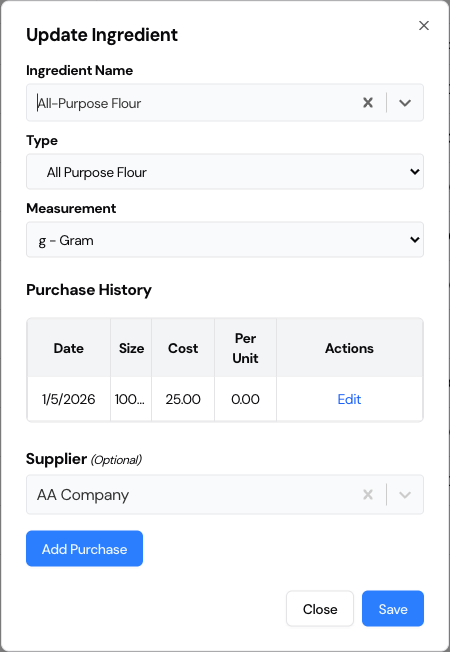
📜 Purchase History Section #
The Purchase History section displays all past purchases for this ingredient.
Each entry includes:
- Date – Purchase date
- Size – Quantity purchased
- Cost – Total purchase cost
- Per Unit Cost – Auto-calculated cost per unit
- Actions – Edit or Delete purchase record
This history allows:
- Cost comparison over time
- Accurate per-unit costing
- Audit and traceability of ingredient purchases
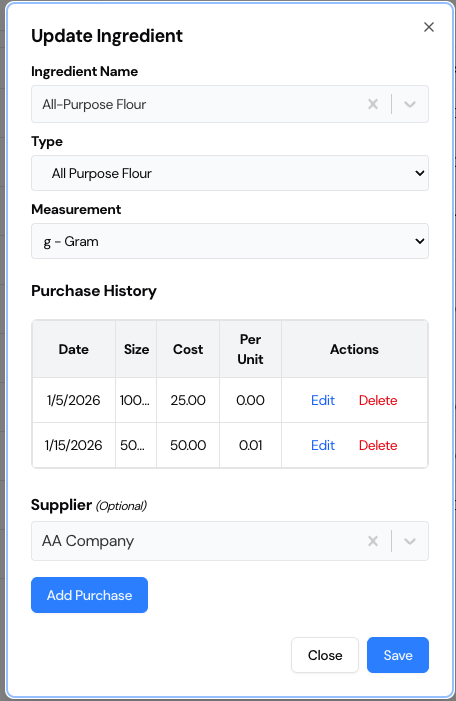
➕ Adding a New Ingredient Purchase #
To add a new purchase (new stock arrival):
- Click Add Purchase
- The Add Purchase popup opens
- Enter:
- Purchase Size – Quantity purchased (e.g., 5000 g)
- Cost – Total cost for this purchase
- Click Add
Bake Boost will automatically:
- Calculate per-unit cost
- Add the purchase to purchase history
- Increase stock quantity
- Update recipe costing where applicable

🔄 Editing or Deleting Purchase Records #
From the Purchase History table:
- Click Edit to correct size or cost
- Click Delete to remove an incorrect purchase entry
All changes are reflected instantly in:
- Stock quantity
- Cost per unit
- Recipe and order costing
🏷 Supplier Assignment (Optional) #
- Assign or update a Supplier for the ingredient
- Supplier information helps with:
- Purchase tracking
- Cost analysis
- Supplier-based reporting
💾 Saving Changes #
After making updates:
- Review ingredient details and purchase history
- Click Save
All updates are immediately applied across:
- Inventory
- Recipes
- Orders
- Cost calculations
- Reports
🔗 How This Impacts Bake Boost Features #
Updating ingredient purchases automatically affects:
- Recipe costing (real-time recalculation)
- Order pricing
- Inventory stock levels
- Profit and margin analysis
No manual recalculation is required.
💡 Best Practices #
- Always add new purchases instead of editing old ones
- Record purchases as they happen to maintain cost accuracy
- Use correct measurement units
- Keep supplier information updated for better insights
✅ Summary #
The ingredient edit and purchase flow in Bake Boost ensures:
- Accurate inventory tracking
- Transparent purchase history
- Real-time cost updates
- Reliable recipe and order pricing
This approach mirrors real bakery operations, helping bakers maintain control over stock and profitability.
🎂 Recipes #
The Recipes feature in Bake Boost enables bakers to build, organize, and cost recipes accurately using the ingredients and supplies managed in the system.
This powerful tool ensures full visibility of ingredient costs, serving sizes, allergen information, and preparation details — all in one place.
Whether you’re creating simple recipes like frosting or complex multi-layered cakes, the Recipes module gives you flexibility and precision
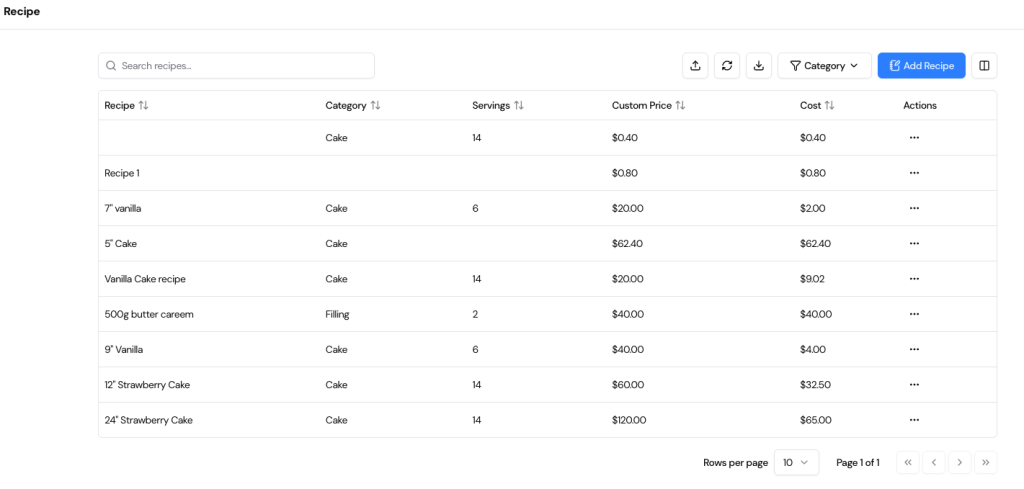
📋 Viewing Recipes #
The Recipe page displays all the recipes you’ve created in one convenient list.
Each row provides essential information about your recipes:
- Recipe Name – The title of the recipe (e.g., 7” Vanilla Cake, 500g Butter Cream).
- Category – The recipe type such as Cake, Filling, Frosting, or Cupcake.
- Servings – The total number of portions or units produced by the recipe.
- Custom Price – The price you assign per serving or per recipe.
- Cost – The total cost automatically calculated based on ingredients and quantities used.
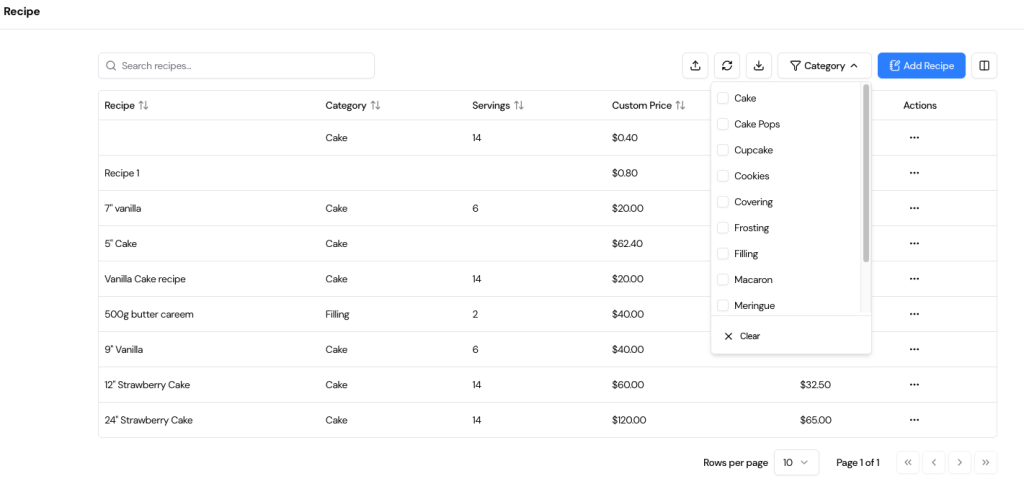
You can also use:
- The search bar to find recipes quickly, and
- The Category Filter to view recipes by type (Cake, Cupcake, Filling, Frosting, Cookies, etc.).
(Refer to the screenshots below for the Recipe List and Category Filter view.)
➕ Adding a New Recipe #
To create a new recipe:
- Click Add Recipe at the top-right of the screen.
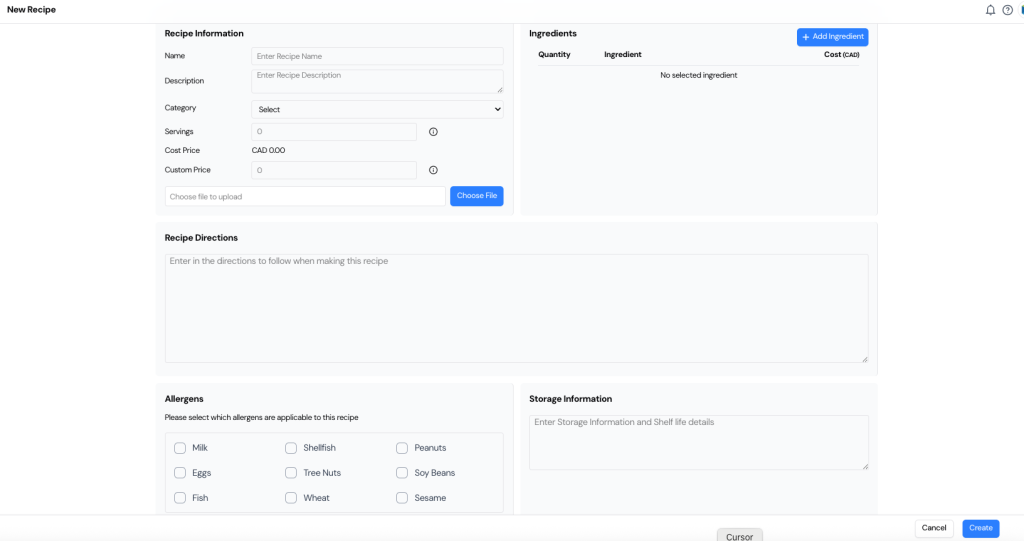
- The New Recipe form will appear (as shown below).
This form is divided into several sections for detailed recipe management.
🧾 Recipe Information #
In the Recipe Information panel, fill in the following details:
- Name: Enter your recipe name (e.g., “9-inch Vanilla Cake,” “Butter Cream Frosting”).
- Description: Add any notes or reference instructions about the recipe.
- Category: Choose the appropriate recipe category (e.g., Cake, Filling, Frosting).
- Servings: Enter the total number of servings the recipe yields.
- Cost Price: Automatically calculated based on added ingredients.
- Custom Price: You may define a selling or serving price manually.
- Image: Optionally upload a photo of the recipe for visual reference.
(See the Recipe Information form screenshot for reference.)
🧂 Adding Ingredients to a Recipe #
Under the Ingredients section, click Add Ingredient to include materials used in the recipe.
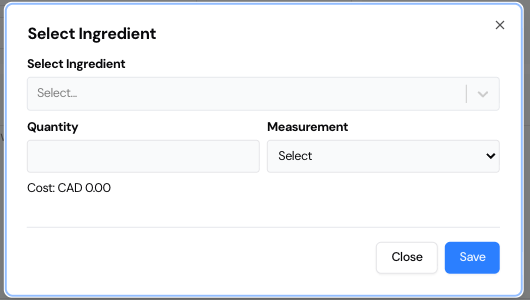
A pop-up titled Select Ingredient will appear.
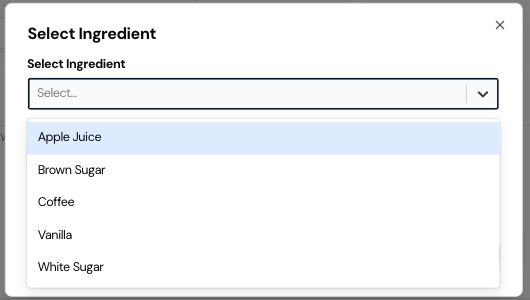
In the pop-up: #
- Select Ingredient: Choose from your list of existing ingredients (e.g., Apple Juice, Brown Sugar, Vanilla, etc.).
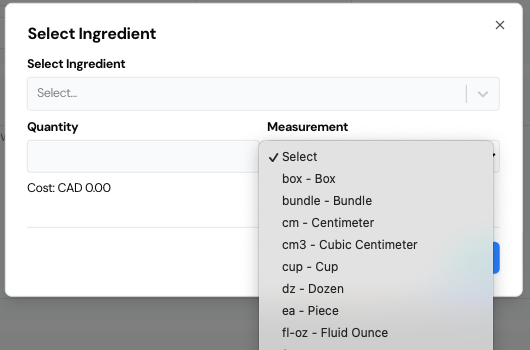
- Quantity: Enter the amount of each ingredient used in the recipe.
- Measurement: Select from various units (e.g., kg, g, L, ml, cup, box, dozen, piece).
As you enter each item, the cost (CAD) is automatically updated based on the ingredient’s unit price.
Click Save to add the ingredient to the recipe list.
(Refer to the ingredient selection and measurement screenshots for guidance.)
You can repeat this process to add as many ingredients as needed — Bake Boost will continuously calculate the total recipe cost in real time.
🧁 Recipe Directions #
In the Recipe Directions section, you can enter detailed step-by-step instructions for preparing the recipe.
Use this area to document preparation steps, baking times, decoration notes, or any special tips your team should follow.
⚠️ Allergen Information #
Bake Boost allows you to track allergen details for every recipe.
Simply check all applicable allergens from the provided list:
- Milk
- Eggs
- Fish
- Shellfish
- Tree Nuts
- Peanuts
- Soy Beans
- Wheat
- Sesame
This helps ensure your recipes are compliant with labeling and safety requirements for customers with allergies.
🧊 Storage Information #
Use the Storage Information section to record how and where to store the recipe, including:
- Temperature requirements,
- Shelf life, or
- Any specific storage conditions (e.g., “Keep refrigerated for 3 days,” “Best consumed within 48 hours”).
💾 Saving Your Recipe #
Once all the details are complete:
- Review the cost summary and ingredient list,
- Click Create to save your recipe.
Your new recipe will now appear in the Recipe list, ready for use in costing, production planning, or scaling for different batch sizes.
💡 Tip: #
Use the Recipe feature regularly to analyze profit margins and optimize ingredient usage.
By keeping all ingredient prices and recipe details up to date, Bake Boost ensures accurate costing and pricing for every item on your menu.
All the modules in Bake Boost — Recipes, Ingredients, and Supplies — are seamlessly integrated with the Orders feature, enabling bakers to manage their production and costing within a single unified workflow. When creating a new order, bakers can easily add recipe items directly from the list of recipes previously made in the system. Each recipe automatically pulls its linked ingredients and supplies, along with their calculated costs, ensuring that the total order price is accurate and transparent. Within the Add Recipe Item window
🧾 Adding Recipe Item to an Order #
The Add Recipe Item feature in Bake Boost links your Recipes, Ingredients, and Supplies directly with the Orders module – allowing complete cost control and production visibility within every order.
When you create an order, you can select recipes already prepared in the system, automatically including all related ingredients, supplies, and cost details.
📋 How It Works #
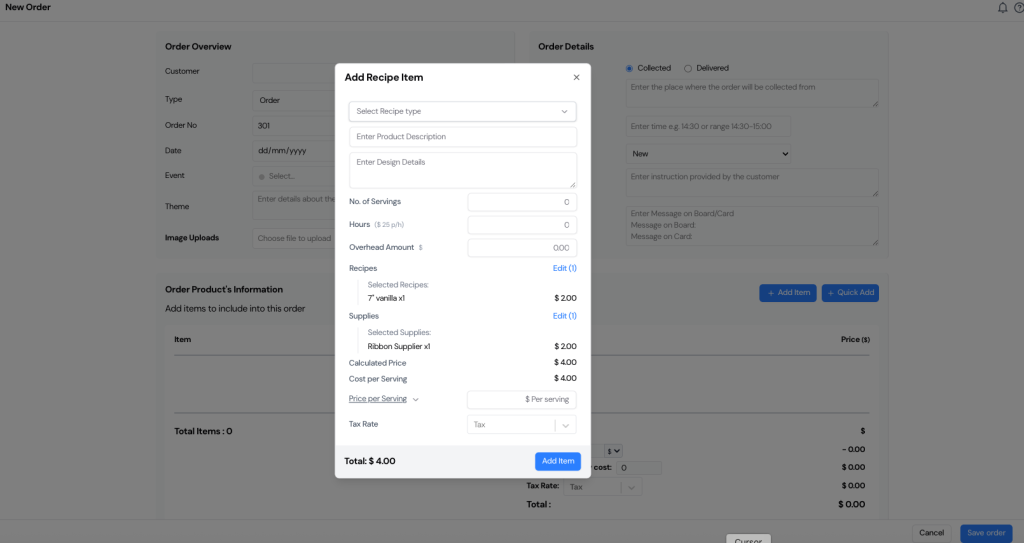
When you open the New Order page and click Add Item, a pop-up window titled Add Recipe Item appears (as shown below).
This form allows you to include recipe-based products in a customer’s order, along with complete cost and pricing details.
🧁 Fill in the Recipe Item Details #
In the Add Recipe Item window, complete the following fields:
- Select Recipe Type: Choose the recipe you’ve already created in the Recipes section (e.g., 7” Vanilla Cake, Chocolate Cupcake).
- Product Description: Add a short description of the product for the order.
- Design Details: Include any custom design or decoration notes for the baker or decorator.
- No. of Servings: Specify how many servings the order requires.
- Hours: Enter the time needed for preparation. (The system applies the hourly rate automatically, e.g., $25/hr.)
- Overhead Amount: Add any additional cost like packaging or decoration material.
🧂 Linked Recipes and Supplies #
Bake Boost automatically links the selected recipe and related supplies with the order.
Each selected item displays its associated cost:
- Selected Recipes: Lists the recipe(s) and their total cost.
- Selected Supplies: Lists additional supplies used (e.g., ribbons, boxes, boards).
Users can click Edit to adjust recipe or supply selections directly from this screen.
💲 Cost and Price Calculation #
Once the ingredients, supplies, and servings are defined, Bake Boost automatically calculates:
- Calculated Price: The total combined cost of recipes and supplies.
- Cost per Serving: The cost divided by the total servings.
- Price per Serving: The price you plan to charge per serving or per recipe.
- Tax Rate: Optional — select the applicable tax if needed.
At the bottom, the Total field updates automatically to show the complete cost of that recipe item.
💾 Final Step #
After reviewing all details, click Add Item to include the recipe product in the order.
The system will save it under the Order Product’s Information section, with cost, price, and profit margin already linked to your recipe data.
💡 Tip: #
Because Bake Boost automatically connects recipes, ingredients, and supplies with your orders, it ensures every sale reflects true production cost – giving you full visibility into profitability, pricing accuracy, and material usage.